

Supplies Needed:
2 fat quarters of cotton fabric (or 2 pieces roughly 12" square)
2 buttons
String or yarn
Thread
Cutting supplies
Pattern paper (we use thick kraft)
Tape
Ruler
Marking Tool (for paper)
1. Make Your Pattern
We wanted to include a how-to on making your own cutting template so that if you choose to make this a different size, you'll know the right steps to make it your own dimensions.

Tape your paper piece down on a surface, making sure your sheet is at least 12" by 12".
Draw out a rectangle that measures 12" wide by 10" tall.

Beginning at the bottom of your rectangle, measure 4" up and draw a horizontal line at the 4" mark all the way across. Do this again, drawing a line 4" above the first 4" mark. Across the top of the rectangle, mark your middle at the 6" mark. Draw a line from each end of your second 4" line (second line from the top) to the middle point on your top line, to create a triangular top.
Cut this piece out, you'll have a small house shape!
2. Prep Your Fabric

Line up your fat quarters or 12" by 12" fabric pieces (one for lining and one for exterior) and press together. Place your cutting template over both pieces, pin all three together. Cut out according to your template piece.
3. Sew Lining to Exterior

Place lining & exterior pieces right sides together (so the printed sides are touching). Pin together. Mark a 2 inch gap at the bottom of the "house" and insert a perpendicular facing needle on either side of this gap. This is to notify yourself not to sew into the gap -- you'll need this part un-sewn so you can flip it right-side out later!

Sew around all sides (beginning at one side of the gap and ending on the other) with a 1/4" seam allowance. Clip your corners approximately 1/8" away from your stitching at each corner, making it easier to have flush corners once you flip it right-side out. Flip right-side out.

Iron flat, making sure that your gap piece seams are tucked neatly inside. Stitch around the entire perimeter of your "house" with a 1/8" seam allowance, so that your gap gets sewn shut.
4. Sew Up Flap

With your piece lying with the interior/lining piece facing up, fold the bottom flat end up until it rests about 1/2" from the corner where the triangle begins. You can adjust where this lies, depending on how you want the triangle to fold down. Pin short sides in preparation for sewing.
Sew up each short end, backstitching over the bottom and top creases where the flap begins & ends (this area will have the most "stress" so it's important to secure with backstitching!). Try to follow along your original stitching so you don't have too many lines showing.
5. Attach Buttons

We used a button & string method to close our envelope, we just love how it looks! Choose a string (ours is cotton yarn by Wool & the Gang, worsted weight) and cut to about 6 inches. Knot one end.

Sew the string on, un-knotted end, to the tip of your envelope triangle in the spot where you'll want your top button. We used a small zigzag stitch and reversed a few times.
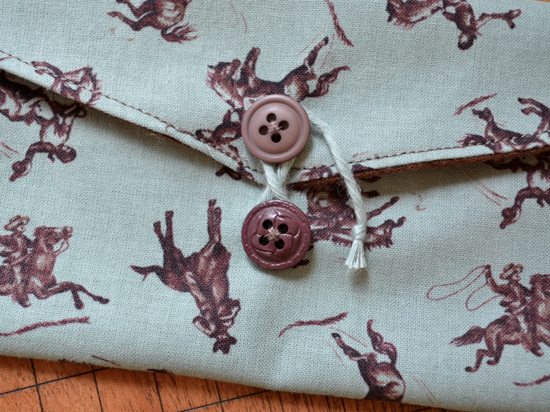
Sew your buttons on, one at the tip of the triangle and the other just below the edge of the triangle. Make sure you're just sewing to one face of the fabric and aren't sewing your envelope shut! Give the buttons some give so that string can rest under it easily without adding stress to the stitches (a wooden matchstick here helps, placed under the button as you're sewing. We wrap our thread between the button & fabric a few times before knotting to secure that distance between button & fabric. See image below from Esquire Magazine:


Voila! You're all set! We love this project for groomsmen gifts, but it can be used for any occasion for someone that wears ties. It's a nice way to separate the tie from other materials or fear of snagging in a suitcase or drawer. Thanks Martha for the inspiration!
No comments:
Post a Comment