

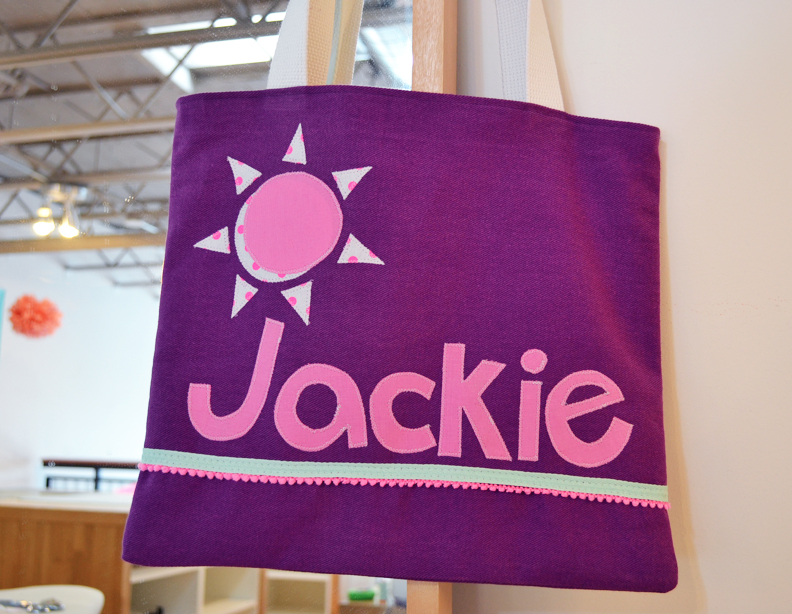
We were recently asked to make a book bag for a tiny toddler heading to a new preschool. Excited to make something special and fun, we followed on the 2-year-old's request for "pink", staying within the school's limit of a 2 handle, 12" by 14" tote bag. As some schools stick to guidelines for what the kids can bring to school (to keep the bags wearable and manageable for the kiddies), it's a great opportunity for a parent to find something special and handmade -- and we had so much fun making it! Follow along to see how we did it, along with some tips on applique!
We made our fabric selections first, shopping at Modern Domestic here in Portland, OR, our home for the last month. They have an incredible selection of a variety of material types, and we were lucky to stumble upon some beautiful purple denim to match with our pink cotton selections. It's sturdier than a regular cotton, but has the drape of something softer than a canvas. Definitely worth the splurge!

We added some fat quarters of various pinks and trimmings in pink to keep our options open -- we wanted to make sure we had a lot of selection before designing our decoration. We knew applique would be the way to go -- but this could also be a great opportunity for patchwork! A name was important here to keep the bag confusion-free from other preschool totes. No running off with this custom tote if we have anything to say about it!
We used thermal fusible webbing from Pellon for our applique. Sometimes we skip the adhesive altogether and just press with our favorite starch alternative (here), but for all of the curves of the lettering, we opted for our "cheater" method of adhering the letters to the fabric before following with a zigzag stitch around all edges to hold it in place.
Ready to start?
Materials:
1/2 yard denim, canvas, or other sturdy material for exterior
1/2 yard cotton for lining
1 yard cotton webbing for straps (ours has plastic inside for a sturdier strap)
Trimming (we used 1 yard of mini pompom trim and 1 yard of 3/8" twill tape)
Assorted fat quarters or scraps for decoration (we used 2 different prints)
Process:

1. Cut the following:
(2) 13" by 15" rectangles from your exterior fabric
(2) 13" by 15" rectangles from your lining fabric
(2) 18" strips of your strap webbing
(2) 15" lengths of mini pompom trim
(2) 15" lengths of twill tape trim
2. Prep your applique
Adhere your fabric to the fusible webbing by ironing the cotton against the bumpy side of your webbing (not the paper side). This usually takes about 20 seconds of pressure under the iron, but follow your specific fusible web instructions for this part.
Peel back paper backing once you've ironed your fusible web to it, leaving only the fabric with the adhesive backing. Cut out desired shapes from the cotton, remembering that hard curves and tiny points are hardest to stitch around. Try to make curves and points fluid!

We used 2 cloud shapes, three different sized rain drops, two circle shapes for the sun, and 8 small triangles for the sun points. We also cut out letters for the name. All of this was done free hand, however, if you're uncomfortable with cutting free-form, then feel free to print out & trace desired shapes. We've seen folks print out letters in bold off Pages or Word, cut those out, and use them to trace out a cutting line on fabric. Do what you feel best about!
Set aside your cut shapes for now.
3. Stitch on trimming

Pin pompom trim about 3 inches from the bottom of your back, across the wide length of your exterior piece. Repeat on second exterior piece. Stitch down, on the webbed part, across the length of your trim with a straight stitch. No need to backstitch, as this will be held down again later with other stitches.
Place flat twill tape above the pompom trim, covering the webbed part, with the pompoms just poking out the bottom. Stitch all the way down with a wide zigzag.
4. Apply applique pieces

Iron your applique pieces that you've cut out onto your exterior pieces, wherever you'd like them! It'll take about 20 seconds under the iron pressure to fully melt the glue into the material (but make sure it's really where you want it before you apply the iron!). Your order should be: exterior piece, applique piece with glue facing the exterior fabric, barrier cloth over the applique piece, iron. The barrier cloth (thin cotton) will act as a protector from any glued edges seeping out onto your iron plates.
5. Stitch down applique

Select a very narrow (about 1.5mm) zigzag stitch, and fairly tight. Satin stitch isn't required, but a tight zigzag is ideal. Line up the exterior edge of your applique piece (applique will fall to the left of your needle) with the needle when the zigzag is in the right-most position to make sure that when you start sewing, the needle will be stitching just off the right edge of the applique piece. This can take some practice, and we certainly recommend if you haven't done it before, to try it with some scraps before doing it on your final project. Make sure you backstitch at each end to ensure that those stitches won't come out. Continue with every edge of each applique piece you have!
 *Note: Stitching on lettering is tedious and requires some skill. If you're just starting out, try squared shapes first, maybe one letter for your first project instead of an entire name. However, if you want to try it, go for it! This is why we encourage you try it on a scrap first, just to get the hang of it.
6. Assemble your exterior

Pin your two exterior pieces, making sure the top edges align and you have right sides facing one another. Stitch around three edges with a 1/2" seam allowance: side, bottom, side, making sure you drop your needle and pivot at each corner to ensure you have nice crisp corners. Follow along again with another straight stitch around all three sides, close to your original stitching but into the seam allowance, not into the main bag area (to the right of your original stitching). We did this to make it extra sturdy, as it may be a bag that is washed a lot. Clip your corners about 1mm from the stitching to remove excess material -- this will make turning out corners easier later.
7. Assemble your lining

Pin two lining pieces together, right sides facing one another, and stitch around three sides with a 1/2" seam allowance. When you reach the bottom, leave a 3" gap between stitches in the center bottom, backstitching before you lift your needle, drag across 3", backstitch and continue around the second corner and side. This 3" open hole will make it possible to flip everything right side out later, and will be stitched up later. Clip your corners about 1mm from the stitching to remove excess material -- this will make turning out corners easier later.
8. Assemble bag

Flip your exterior piece right side out. Your lining pouch will still be wrong-side out. Slide your exterior pouch into the interior pouch, so that right sides are touching and the tops Pin outside edges to line them up and keep the lining and exterior pieces together.
Make a "U" with one strap piece, making sure there is no twist in the strap. Slide between the lining and exterior piece on one side, and pin along the top, 3" from each outside edge. Repeat on other side.
Sew around the entire top of your bag with a 1/2" seam allowance, making sure you're catching the lining, exterior, and strap webbing as you go along. Repeat into the seam allowance with another line of stitching, just to the right of your original line of stitching. This will add stability to the straps, so they won't rip out under pressure. We then went back over just the strap connections with wide zigzags, to add extra strength at those joints.

9. Flip bag out

Pull everything (including your straps, be gentle when pulling) out through the gap hole you left in your lining. Once your lining is right-side out, iron down the interior seam allowance and stitch shut from this side, across the 3 inch gap.


Push the lining into the bag, and push out all corners. Iron around the top edge, making sure that the lining remains out of view from the exterior, tucked just under the exterior top edge. Go back to your machine and topstitch around the top opening to keep the lining in place.


10. You're all set! Insert your favorite library book and send them off to learn!
If you're in Atlanta and looking to learn some applique skills, check out our HomeDec 101 class, where you'll learn the basics of applique while making a zippered pillow cover!
No comments:
Post a Comment