Sunday, February 24, 2013
Painted Cutlery - Simple DIY in the Kitchen
As we continue prepping our studio for greatness, we didn't want to miss a craft opportunity when it came to our small kitchen. Although it's small, it faces out to the rest of the studio so it's very visible. We're slowly making changes, but I seem to get fixated on the small details before stepping back to take care of the big things (kitchen towels, still not there!). I found a great set of painted cutlery on Pinterest and decided to make some of our own. Click through to read about the process.
My main concern with the paint was that it was non-toxic and dishwasher safe. We share the space with three others, so trying to get everyone to hand wash delicate silverware was simply not going to happen. I did some research and settled on spray-on enamel, as the enamel is non-toxic once dry so if you happen to ingest a chip, it's no biggie, and it's a common choice for painting metal in serving ware and outdoor furniture. If enamel can withstand the outdoor elements, I'm sure it can withstand a half hour every week in the dishwasher (right?).
I took to the thrift stores to find the silverware and gave it a good scrubbing before painting. It was actually really really hard to find forks in the Atlanta thrift store scene, makes me wonder why. Are people scavenging for forks for projects, are people losing forks more than spoons & knives, or do the prongs break before they can make it to the thrift store? Confused, I had to find one or two forks each across 4 or 5 thrift stores before I had enough. We could still use more, but I wanted 8 before getting started on the fun part. Painting the handles is best when you have a variety of cutlery because it can bring the hodge podge all together but brings out the interesting handle designs.
I taped a smooth line where I wanted the paint to end on the handle, and covered each top with paper, held down with more painter's tape. These were then attached to a piece of cardboard, handles facing out, so that I could hold & paint without having to wait to turn the pieces when a layer dried -- I could get the front & back in one swoop this way. This sped up the process quite a bit!
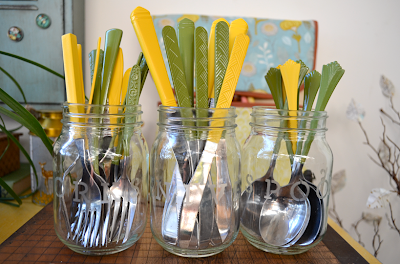
I primed the forks with Rust-oleum Clean Metal Primer, which is supposed to add to the stick-ability of your paint. Supposedly it has twice the adhesion and rust protection, so I was sold! It goes on white and matte so your color will go over it perfectly bright. The primer dried in 5 minutes, and I put my color right over it. I indiscriminately used a moss green and mustard yellow, mixing it up between two boards with a mix of spoons, forks, and knives. This way I could easily add a color in the future and it wouldn't have to be exact to the forks, for example. They're all mixed up so nothing new would make it any different.
After allowing them to dry overnight (about 12 hours) they were still a little bit tacky when they bumped one another, although it didn't mess up the paint. I removed all of the tape & paper and allowed them to lie out and dry for another 48 hours. Gave them a good hand wash and they were good to go!
I got a little nervous thinking about them bumping in the traditional kitchen drawer silverware holder, so I decided to get a little crafty with that, too. I just purchased a case of medium-sized mason jars, and decided to do some glass etching on them to make the distinctions between silverware so you wouldn't be digging to find what you needed. Using Martha Stewart lettering stencils and her Glass Etching Kit, I had a jar etched for each Forks, Knives, and Spoons. They turned out so well, and add to the countertop decorations which is a big plus! This calmed my nerves about the handles constantly scraping one another, and added to the slowly progressing decor in the studio. I also love them because if we have a communal dinner at our huge metal table (photos soon) we can just bring the jars to the center for people to grab what they need. Hooray!


